Widgets are the knobs, sliders, and blinky lights that exist in the user interface Panel. When a widget module is created in the module Workspace, its interface component is also created in the Panel, in the upper left corner of the current Panel view. You can move the widget wherever you like by shift-click and drag. For more information on how to group Widgets within the Panel, see User Interface Panel and Widgets.
Input Widgets: Knob Slider HSlider Button FlatBtn TypeIn IncDec ListBox ListCols XYPad Keybd
Array Widgets: ASliders, LedGrid, NumGrid TxtGrid TimeLine
Display Widgets: Meter, HMeter LED Readout BioAAdr Draw
Documentation Widgets: Label DocBox DocPic Frame
Input widgets (red icon) include Knobs, Sliders, and Buttons. The Workspace modules for these have one output, which is the current widget value, and one input, for changing the output value and widget graphics (such as knob pointer) under program control. Input widgets can save and restore their value settings as Snapshots.
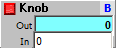

Panel Knob. Can be set to rotary motion or slider motion (default) by setting the "Slider gestures" check box in Properties. When checked, use an up/down motion for large changes, and a left/right motion for small changes. When unchecked, click on the knob then move out and around to change values; the further out from the center of the knob, the finer the control.
Widget Properties Dialog
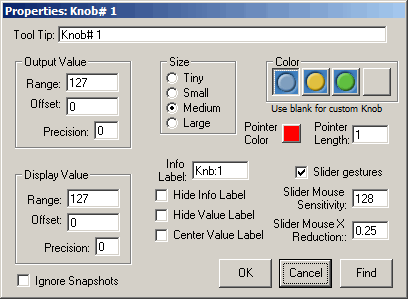
All widgets have a Properties Dialog, which is accessed by clicking on the upper right Properties button of the module or by right clicking on the widget in the Panel. Each dialog is customized for its widget, so they look slightly (or greatly) different, but they all do essentially the same thing, which is to customize the look and action of its widget.
Output:
Out: Position value.
Input:
In: Change to set a new position and output value.
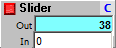
Panel Slider. Use an up/down motion for large changes, and a left/right motion for small changes.
Output:
Out: Position value.
Input:
In: Change to set a new position and output value.
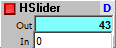

Panel Horizontal Slider. Use a left/right motion for large changes, and an up/down motion for small changes.
Output:
Out: Position value.
Input:
In: Change to set a new position and output value.
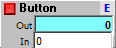

Multitype panel button. Can act as Strobe, Hold (on while pressed, off when released), On/Off, and Option, as selected in the Property dialog. When using as Option, the Group must be set to any value other than 0 (which is reserved for other button types), and all option buttons that work together must be set to the same Group.
Output:
Out: Position value. Default is 0/1, but any On/Off value can be set in the Property dialog.
Input:
In: Change to set new value. Inputs may be 0 or 1 (NZ), output will be as set by Property.
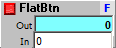

Multitype flat button with separate On and Off captions and colors.. Can act as Strobe, Hold (on while pressed, off when released), and On/Off, as selected in the Property dialog.
Output:
Out: Position value. Default is 0/1, but any On/Off value can be set in the Property dialog.
Input:
In: Change to set new value. Inputs may be 0 or 1 (NZ), output will be as set by Property.
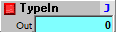

Panel type in input box. You can type text or numeric values; however snapshots only restore numbers and will restore text as "0." If using the TypeIn for text entry, you can set the No Snapshots checkbox in the Properties pop up.
Output:
Out: The text or numeric value typed into the widget. Value does not show up in the output until focus is changed away from it, either by clicking or tabbing to something else. This enables you to type in a multi digit number without having the unfinished value show up prematurely in the output.
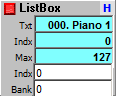
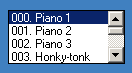
Provides several types of listbox data selection. To select the type of data to list, and/or to type or copy a list of words to use as the ListBox selections, use the module's top right Property button. The Property popup will have the usual resizable widget module on the left, and a text editor box on the right. Type or copy a list of words into the text box to set the selection list. Alternately you can select other data sources for the selection list by selecting one of the the Source option buttons, to the right of the text box:
Text - Use words from the text box.
Txt Module - Use lines from a text source module (TxOpen, TxNote, TxClone or TxParse) as the list elements. Give the source text module handle to the Bank input. When the widget is initialized it may attempt to read the text source before the text has been loaded and you may get a "Not a text source module" error. This will self correct the next clock cycle and may safely be ignored.
Programs - Use MIDI Program names from the file in the ArtWonk\Names directory. The default name set is the General MIDI Bank and GM Program names, but you can change the text files in the Names directory to work with whatever Bank and Program names your sound card, synth, or soft synth uses. See the readme.txt file in the Names directory for additional information.
Banks - Use MIDI Bank names, as above.
Drums - Use MIDI Key Number ("Note") and Kit number text names which come from a file in the ArtWonk\Names directory. The default name set is the General MIDI Chanel 9 Percussion Instruments Kit, in the text file, "GMPercNames.txt", which is the single entry in the Drum Kit file, "DrumKits.txt," but you can change the text files in the Names directory to work with whatever Drum Kit and Drum names your sound card, synth, or soft synth uses. See the readme.txt file in the Names directory for additional information.
Kits - Use MIDI Drum Kit names, as above.
BioPitch - Use the current list of 20 pitch tables for bio sequence Amino Acid Notes. This is the set of pitch translation tables for the 21 possible amino acid values produced by the Bio Sequencers and accessible with the AANote module or from the Options Menu Bio Pitch Tables.
BioSeq - Use the current list of Bio Sequences. These are the Bio Editor translations of the original protein or DNA source files, which are selectable with the Seq# input of the BioSeq modules. Using this list allows you to select the Seq# from a named list rather than numerically.
FitScale - Lists the available scales that can be used by the FitScale module.
Output:
Txt: List Text selected.
Indx: List Index selected. Plug this into the module's own Indx input if no other modules are connected, to cause the currently selected index to remain selected when the module is loaded from a file or macro.
Max: Maximum list index (count-1).
Input:
Indx: Change to set new list index.
Bank: Set Bank for if source is Programs or Drum Kit if Drums; or or text source module handle if Txt Module. Any change reloads list. To update the list when new text is in the same text source module use an inverse strobe (strobe 0, then return to handle number) - use Block module to easily do this.
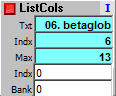
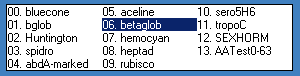
Similar to ListBox widget, above, but allows multiple columns. The overall action and the Property dialog choices are the same, but additionally there is a slider to set multiple Columns.
Output:Txt: List Text selected.
Indx: List Index selected.
Max: Maximum list index (count-1).
Input:
Indx: Change to set new list index.
Bank: Set Bank for if source is Programs or Drum Kit if Drums; or or text source module handle if Txt Module. Any change reloads list. To update the list when new text is in the same text source module use an inverse strobe (strobe 0, then return to handle number) - use Block module to easily do this.
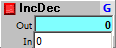

Two part click button to increment or decrement a value. Hold a button down to automatically repeat the increment or decrement to the limits set.
Output:
Out: Value of the current setting.
Input:
In: Change to set new Out value.

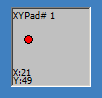
Two dimension joystick-like controller. Consists of a square pad and a puck that you move around within the pad. The left/right position is sent to OutX, and the up/down position is sent to OutY. Unlike the slider, this widget uses absolute position control in order to keep the mouse cursor on the puck. This means accuracy of the pad is dependent on its size and on the resolution of your mouse.
Outputs:
OutX: Left/right position value.
OutY: Up/down position value.
Input:
In X: Change to set a new X position and output value.
In Y: Change to set a new Y position and output value.

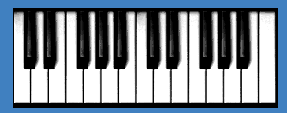
A resizable 2 octave keyboard, that can be combined for 4, 6, etc., octaves. See the Keybd48 macro to see how to extend to larger keyboard range.
Outputs:
Key: Value of last key pressed.
Gate: True (1) when a key is pressed.
Input:
In: Set keyboard output and graphic (-1 for none pressed).
Array widgets (orange icon) provide multiple widgets in one module. These modules use an array for their output values, which can be accessed by Array Sequencer modules or array functions in the Function module.
Array widgets provide an array number output (Ary#), that array sequencer modules, etc., can use to access the widget values. Values are sent to the array in left to right, top to bottom order followed by one last array element that contains the index of the last clicked on widget. Writing to any of the array elements automatically update the associated widget graphics.
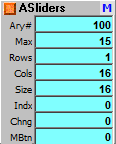
Matrix of Slider widgets. Use the properties pop-up to set the number of sliders per row and column. A button in the upper left switches quickly from horizontal to vertical orientation. Slider values can be accessed from the module's array (Ary#) with any of the array sequencer modules.
Outputs:
Ary#: The array used by the module to get and send its values. This is an automatically managed array number, same as created with the AryNumber sequencer module. The actual value can change when the patch or file is reloaded, but the contents of the array are automatically restored. Thus, the value should be used only as a connection (not typed in) to the Ary# inputs of array modules used to access the widget values.
Max: The 0-based index number of the last (maximum) widget in the array.
Rows: The number of horizontal lines of widgets.
Columns: The number of vertical lines of widgets.
Size: The number of widgets in the array. This is Rows x Columns, or Max+1.
Indx: The index (0-Max) of the last widget clicked with the mouse.
Chng: Increments each time a widget array value changes.
MBtn: Mouse button state: 1 when the widget is clicked with the mouse, 0 when the mouse button is released.
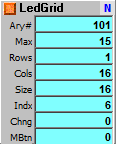

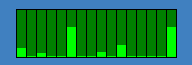
Matrix of On/Off LED type widgets. Use the properties pop-up to set number of LEDs per row and column.
The LEDs can be turned on and off by changing the values of the array given by the Ary# output, or by clicking on a LED with the mouse. Values are True (any non zero value) or False (0). You can specify optional On and Off labels or automatic numbering labels with the Properties dialog.
Outputs:
Ary#: The array used by the module to get and send its values. This is an automatically managed array number, same as created with the Array sequencer module. The actual value can change when the patch or file is reloaded, but the contents of the array are automatically restored. Thus, the Ary# value should be used only as a connection (not typed in) to the Ary# inputs of array modules used to access the widget values.
Max: The 0-based index number of the last (maximum) widget in the array.
Rows: The number of horizontal lines of widgets.
Columns: The number of vertical lines of widgets.
Size: The number of widgets in the array. This is Rows x Columns, or Max+1.
Indx: The index (0-Max) of the last widget clicked with the mouse.
Chng: Increments each time a widget array value changes.
MBtn: Mouse button state: 1 when the widget is clicked with the mouse, 0 when the mouse button is released.
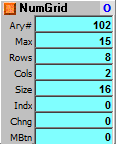
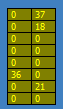
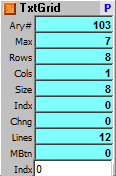
Matrix of number label type widgets. Use the properties pop-up to set number of labels per row and column. Values can be adjusted with the mouse by clicking on them and dragging up and down, as with a slider. The label values can be accessed from the module's array (Ary#) with any of the array sequencer modules.
Outputs:
Ary#: The array used by the module to get and send its values. This is an automatically managed array number, same as created with the AryNumber sequencer module. The actual value can change when the patch or file is reloaded, but the contents of the array are automatically restored. Thus, the value should be used only as a connection (not typed in) to the Ary# inputs of array modules used to access the widget values.
Max: The 0-based index number of the last (maximum) widget in the array.
Rows: The number of horizontal lines of widgets.
Columns: The number of vertical lines of widgets.
Size: The number of widgets in the array. This is Rows x Columns, or Max+1.
Indx: The index (0-Max) of the last widget clicked with the mouse.
Chng: Increments each time a widget array value changes.
MBtn: Mouse button state: 1 when the widget is clicked with the mouse, 0 when the mouse button is released.
Matrix of text label type widgets. Use the properties pop-up to set number of labels per row and column, and to set the label text. You can type the labels directly into the text edit window, or paste from the Windows clipboard. Labels will automatically be created from this text, one label per line, and the Range is automatically set to the number of lines. Output values can be adjusted with the mouse by clicking on a widget and dragging up and down, as with a slider. The label values can be accessed from the module's array (Ary#) with any of the array sequencer modules.
Outputs:
Ary#: The array used by the module to get and send its values. This is an automatically managed array number, same as created with the AryNumber sequencer module. The actual value can change when the patch or file is reloaded, but the contents of the array are automatically restored. Thus, the value should be used only as a connection (not typed in) to the Ary# inputs of array modules used to access the widget values.
Max: The 0-based index number of the last (maximum) widget in the array.
Rows: The number of horizontal lines of widgets.
Columns: The number of vertical lines of widgets.
Size: The number of widgets in the array. This is Rows x Columns, or Max+1.
Indx: The index (0-Max) of the last widget clicked with the mouse.
Chng: Increments each time a widget array value changes.
Lines: The number of label text lines, the widget's range.
MBtn: Mouse button state: 1 when the widget is clicked with the mouse, 0 when the mouse button is released.
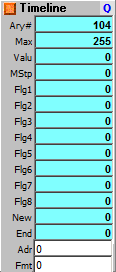

The TimeLine provides a means of controling events by drawing event labels onto a time line track. Labels can be labeled and colored; as the module advances the timeline cursor, information about the label the cursor is tracking over becomes available at the module as event flags and label ID numbers. Each Timeline widget can have up to 128 event labels, which can be set to any of the 8 event IDs.
To create an event label, double click on an empty part of the track.
To delete an event label, double click on the label.
To change event flags, right click on the label. It will cycle from 1 to 8.
To change size, left click and drag on the right end of the label while holding down either the shift or ctrl key.
To move a label, left click and drag while holding down either the shift or ctrl key. For very small labels, hold down both shift and ctrl keys at once to move the label instead of stretching it.
Outputs:
Ary#: The array used by the module to get and send its values. This is an automatically managed array number, same as created with the AryNumber sequencer module. The actual value can change when the patch or file is reloaded, but the contents of the array are automatically restored. Thus, the value should be used only as a connection (not typed in) to the Ary# inputs of array modules used to access the widget values.
Max: The 0-based index number of the last (maximum) widget in the array.
Valu: Value (1-8) of the event at Adr, or 0 if no event.
MStp: Step val when mouse clicked on track or label.
Flag1-8: Flag true (1) on event 1-8 (Valu=1-8).
Indx: The index (0-Max) of the last widget clicked with the mouse.
New: Strobe true (1) on changed event.
End: True (1) when last array element is addressed.
Inputs:
Adr: Step read address. Connect to a counting module such as the Stepper.
Fmt: Strobe to format a Timeline from Ary# values.
Display widgets (yellow icon) which include Meter, LED, and Readout modules, have one input, the value to show in the display readout, and no outputs.

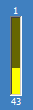
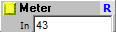

Simple vertical and horizontal level display meters.
Outputs: (none)
Input:
In: Value to display.
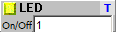

LED type blinky light. When displaying fast changing values, such as strobes, use the Flash module to hold the LED on long enough to see it.
Outputs: (none)
Input:
In: 0 for LED Off, 1 (NZ) for On. Alternatively, you can set the LED to turn On if the input is equal to a specific number, set in the Property dialog. This is useful for setting up a row of LEDs to show a sequencer step, so at each step the LED assigned to that step value is On, and the other LEDs are Off.
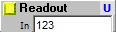

Numeric or text readout label. Use this for changing readout values; for static values use the Label module, which takes fewer resources. Double click on the widget to copy its value to the clipboard.
Outputs: (none)
Input:
In: Text or value to display.

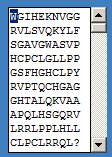
This is a readout of Amino Acids for the BioSeq module. There is no Property button for this widget; the only settings are at the module inputs.
Outputs: (none)
Inputs:
aAdr: Amino Acid address to display. Should be connected to the aAdr output of the BioSeq module. The amino acid currently being sequenced is indicated by the highlighted single letter name of the AA in the text box. Text will automatically scroll to always have the current AA in view.
Seq#: Select protein sequence 0-23). This should be the same as the Seq# input to the BioSeq module. The widget and module tool tip shows the name of the protein sequence.
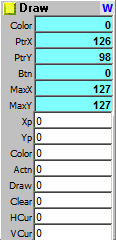
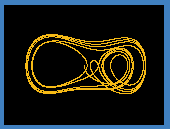
Draw area with ability to draw lines and dots, and to read mouse cursor position and color; automatic graphing of array contents. This module duplicates some of ArtWonk's graphics functions; it enables MusicWonk to visualize fractals, and to provide a consistent data visualizing component across ArtWonk and MusicWonk.
Outputs:
Color: Color value at the (Xp, Yp) graphics point when Action=0. Only updates when the Draw input changes. Use Col2RGB module to convert 24 bit color value to RGB triplet.
PtrX, PtrY: Mouse X,Y position on the image, in pixels.
Btn: Mouse Button: 0=up; 1=pressed.
MaxX, MaxY: Maximum X,Y of the image, 0 based. This is 1 less than the width & height.
Inputs:
Xp, Yp: X,Y position of graphics pointer.
Color: Color to draw with. Use the RGB2Col module to convert R, G & B triplet to 24 bit Color.
Actn: Draw action the module takes when Draw input changes:
0 = No action, but the Color output is updated when the cursor is over
the image.
1 = Line-to. A line will be drawn from the previous Xp, Yp to the
current.
2 = Dot is drawn at the current Xp, Yp.
100 - 999 = Draw a graph of the given Array.
1000 - 1023 = Draw graph of the given BioSeq
Sequence # 0-23 (you need to add 1000 to the sequence number for a range
of 1000 to 103).
Draw: Any change to initiate draw.
Clear: Strobe to clear image; fills image with background color: 1 for black (color 0), any positive value fills with that color; negative numbers cause an instant clear (does not wait for Strb) to the positive value color.
When Actn is set to graph an Array (100-999) or BioSeq (1000-1029), the Clear strobe will clear the image and draw the entire graph.
HCur, VCur: Horizontal and Vertical position of moving cursor. When set to 0, cursor is not drawn.
Documentation widgets (green Icon) which include Label, Doc Box, Doc Pic and Frame modules have no inputs or outputs.


Static text or value label. Set the value to be displayed with the Property dialog. Background can be transparent, as in the example image.
Outputs: (none)
Inputs: (none)
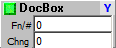

Multi line text display box. Set the text to be displayed with the mini editor in the Property dialog. Resize the text box by click and drag on the bottom or right edges of the box.
This module can be set up as a static display of the text within its mini editor, or it can be a dynamic display of external text files. Select by checking the Properties "Inputs" check box for dynamic display with the two inputs; or uncheck for a static display of its text and no inputs. When set up as a static display with no inputs, the module takes up virtually zero CPU time.
When set as a dynamic display for text modules, the DocBox module serves a dual purpose. Any of the text modules that has a handle output can be set to display its text by connecting the handle to the DocBox Fn/# input. Or, you can load a text file into the DocBox by giving it a file name. Displays text files only (as you would create with NotePad). Doc files and other formatted file types will display the formatting characters.
When displaying text module contents, if the DocBox is to be rapidly changed, the Autosize option in the Properties pop up should be unchecked, leaving it on will result in screen flicker.
Outputs: (none)
Inputs (with "Inputs" option checked):
Fn/#: Path & file name for text file, or handle for text source module with handles
Chng: Any change loads text into doc box
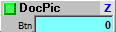
Display a .bmp .gif or .jpg picture. Use Properties to set image file. If the picture file is not found in the folder set by the Property dialog, it will look for it in the current Patch folder and the ArtWonk Graphics folder.
Outputs:
Btn: NZ (1) when left mouse button is pressed while cursor is over the image.
Inputs: (none)

A transparent box that can be used to group other widgets (including other frames), and to move them as a group. Double click on the inside of a frame to switch between grouping and floating (when floating the frame becomes a graphic only and does not cause widgets within it to move with it). When grouping, the frame label is highlited, and it can only be moved by shift-click-drag. When floating the label is black and you can move the frame by click-drag (no shift needed).
Outputs: (none)
Inputs: (none)
ArtWonk is Copyright © 2003-2014 by John Dunn and Algorithmic Arts. All Rights Reserved.