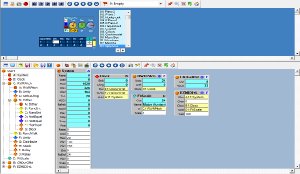
ArtWonk consists of 4 separate screen areas, the blue user interface area called the Panel; the light blue module Workspace area below the Panel, called the Workspace; a tree view of all existing modules located to the left of the Workspace,called the Module Tree, and (ArtWonk only) the separate, floating windows for graphics display called the Canvas and Screens 1-4.
The partitions between the three main window screen areas may be resized by click-and-drag on the partition borders. To open or hide the floating main Canvas graphics screen, select Options/Graphics, or tap the F3 function key on your keyboard, or select the Canvas (C) button in the panel toolbar. To open or hide any of the additional 4 Graphics Screens from the panel toolbar, click the appropriate toolbar button 1-4. You can make size adjustments to all of the Graphics Screens (C)-(4) by right-clicking in the screen space and selecting from the options in the resulting context menu.
The Panel is the user interface to the modules. When you create widget modules (modules for knobs, sliders, button, etc.) the module exists in the Workspace like any other module, but the widget (the knob, slider, etc.) exists in the Panel.
Scroll bars and mouse wheel
The Panel display is quite large, some 2000x2000 pixels. You can move around in the Panel space by moving the scroll bars or with the mouse wheel. When using the mouse wheel, if you place the mouse pointer toward the bottom edge of the screen the wheel will scroll it horizontally, placing the mouse pointer toward the right edge of the screen causes it to scroll vertically. Placing the mouse pointer anywhere else in the screen moves the scroll bar in the last direction previously set. Mouse wheel sensitivity can be user adjustable from the Global Settings pop up. To disable the mouse wheel, set its sensitivity to 0.
Moving and grouping widgets
To move a widget, hold down the shift (or control or alt) key, and then click and drag on the widget. You can also create a temp group box around any widgets you want to move by clicking on the panel background and dragging the mouse to enclose the widgets in the resulting temporary group box.
You are free to group widgets any way you like, and to place them anywhere in the Panel you care to. Unlike modules in the Workspace, which adhere to a strict scope restriction and can only "know" about modules within the same macro level, widgets in the Panel are free form and have no scoping restrictions.
Copy, paste and delete widgets
Copy, paste and delete widgets in the Panel by performing the operation on their module in the Workspace. You cannot directly delete a widget from the Panel. When you paste a widget module, or load a macro that has widgets in it, the widget will appear in the Panel in exactly the same position as it was when it was originally saved. This means widgets will exactly overlay each other if you copy then paste their modules. However when widget modules are pasted, all associated widgets are group selected, and a hand icon will appear in the upper left of the group. You can move the hand icon to move the entire pasted widget group. Click on the Panel background to dismiss the hand icon and to ungroup the widgets.
Group frames
A widget group frame is a transparent box that can be used to group other widgets (including other group frames), and to move them as a group. Double click on the inside of a group frame to switch between grouping and floating (when floating the frame becomes a graphic only and does not cause widgets within it to move with it). When grouping, the group frame label is highlited, and it can only be moved by shift-click-drag. When floating the label is black and you can move the frame by click-drag (no shift needed).
Finding widgets and their modules
Most widgets have properties, which you can access either by clicking on their module's property button (the rightmost blue letter-button on the top line of the module), or by right clicking on the widget itself. The properties include such features as are appropriate to the widget, but all widget property dialogs includes a Find button. If you opened the property box by right clicking on the widget itself, the Find button will find the widget's parent module by making its macro level current and setting the Workspace scroll bars to position the module in the upper left of the Workspace screen. If you opened the property dialog from the module, the Find button will find the widget by setting the Panel scroll bars to position the widget in the upper left of the Panel display.
The light blue colored module Workspace contains modules and documentation objects. See the Modules page for additional information on modules.
Like the Widget area, the module Workspace is quite large, some 2000x2000 pixels. You can move around in the Workspace by moving the scroll bars or with the mouse wheel. When using the mouse wheel, if you place the mouse pointer toward the bottom edge of the screen the wheel will move it horizontally, placing the mouse pointer toward the right edge of the screen causes it to scroll vertically. Placing the mouse pointer anywhere else in the screen moves the scroll bar in the last direction previously set.
Unlike widgets in the Panel, the Workspace shows only the modules belonging to the current macro level. You can move around to different macro levels either by clicking on the macro open button (@) on macros or the macro close button (#) on the Self module, or by clicking on the Module Tree. But in all cases there will never be modules displayed other than those at the current macro level.
Workspace pages, macro levels
When you enter a macro module either by clicking on the "@" button of the macro, or the "#" button of the Self, or by clicking on a different node in the Module Tree, you will change to a different macro level, and a new set of modules - the child modules of the parent macro - will be displayed in the Workspace. This is called the macro level or the or the current Workspace page.
Module documentation objects
Documentation objects include doc boxes for text, plus pictures and group frames. Workspace doc objects are similar to widget doc objects in appearance and function but they are fundamentally different because they have no associated module.
![]() Create, delete
and edit Workspace doc objects with the toolbar "Document Workspace"
button which is the pen and tablet icon. Right clicking on an existing
documentation object will also pop up the dialog, with the object
selected.
Create, delete
and edit Workspace doc objects with the toolbar "Document Workspace"
button which is the pen and tablet icon. Right clicking on an existing
documentation object will also pop up the dialog, with the object
selected.
Using the Document Workspace dialog
To create a new doc object, click on the + button for the type of object (Doc Box, Group Frame, or Picture) you want to create. A doc object will be created in the upper left corner of the currently visible Workspace screen area. Scroll through objects already created with the arrow buttons. Doc boxes will show their text in the text edit area, Group frames will show their Frame name, and Pictures will show a thumbnail of the image. Edit doc box text in the edit box, using the buttons along the top of the edit box to control the doc box appearance.
To delete an existing doc object, first scroll to it with the arrow buttons, then select the "-" button to delete the selected object.
Moving doc objects in the Workspace.
You can move doc objects by clicking on them and dragging them to wherever you like. You can move to an offscreen location, then use the Fetch button in the Documentation Workspace dialog box to instantly move the box to the upper left corner of the currently visible screen area.
Grouping modules and doc objects
You can group modules and doc objects by clicking on the Workspace background and dragging the corner of the resulting rubber band box to enclose the objects you want to group. Grouped modules may be moved, fetched, cut copied or pasted. Any doc objects included in the grouping will be moved with the grouped modules if they were completely enclosed by the rubber band box, but they do not cut, copy, paste or fetch with the grouped modules.
Group frames
A Workspace group frame is a transparent box that can be used to group modules and other doc objects (including other group frames), and to move them as a group. Double click on the inside of a group frame to switch between grouping and floating (it becomes a graphic only and does not cause objects within it to move with it). When grouping, the group frame label is highlighted, when floating the label is black.
The module tree supplies an overview of all modules in a patch. Use it to navigate the modules as you would use a Windows Explorer folder tree, with macros as folders and other modules as files. You can click on a module in the tree to open up the Workspace page that holds the module. The selected module will be highlighted in both the tree and in the Workspace page (the module's label will turn white).
ArtWonk uses a flexible multi image compositing and display system based on the Canvas (the main draw area), which you can display or hide with the "C" button on the Panel Toolbar, plus 4 additional Screens which can also display images and can be shown or hidden with the four ("1" to "4") buttons on the Toolbar next to the Canvas button. Additionally, there can be any number of active undisplayed images, called Buffers, that can be used for virtually unlimited processing and merging of your images.
Drawing and processing modules by default operate on the Canvas, so you do not need to deal with the buffers, screens and other compositing tools until you have a specific need for them. Simply set up the graphics modules you want to use and they will display on the Canvas.
You can right click on any of the display screens to change screen resolution, and to erase, copy and paste the image. These functions are also available programmatically from the modules.
ArtWonk is Copyright © 2003-2014 by John Dunn and Algorithmic Arts. All Rights Reserved.