ArtWonk is all about modules. These are graphical representations of a database that that controls the workings of your patch. When you save a patch or macro file, it is the ArtWonk data base that is saved, not the graphical representations or even the functions. This makes ArtWonk files portable across different versions.
Artwonk modules are consistent in size and shape. Each module is exactly the same width, and the length is always the same for the same number of inputs and outputs. This makes grouping of modules easy, and it gives ArtWonk an efficient method of creating the module graphics. Here is a typical ArtWonk module:
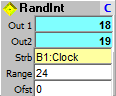
The top line contains an icon that identifies the module group and type, followed by the module's name, and its position in the module run list for the current Macro level (called the Priority), identified by a single character (A, B, C, D,..).
Module labels
All modules will have a tool tip for the module itself and each label in the module. In many of the modules these tool tips can be user settable from the module's Properties, which are accessible by clicking on the Property button, which is rightmost on the top line of the module and is labeled with the module's Priority (the blue "C" in the example above). Modules that have user settable properties will have a blue Priority button, and the tool tip will say, "Set Module Properties." Modules without user settable properties will have a black priority label, and the tool tip will say, "Module Run Order."
Labels, their tool tips, and even the module tool tip can be changed to whatever you like by right clicking on the top of the module to call up the context menu, and selecting "Relabel." This will pop up an edit box with the module tool tip on the top line, with input and output labels and tool tips following, one per line. The label + tool tip format is:
Label~Tool tip
...with the tilda (~) character separating the label from the tool tip. You can replace this text with any of your choosing, just remember you must keep the number of lines the same, one for each input and one for each output, and you must separate the label and the tool tip with the tilda (~) character with no spaces between.
Module outputs
Modules can have any number of outputs from none to dozens. Outputs, if there are any, start at the 2nd line of the module and continue down, one module line for each output. Many modules, such as the Rand Int module illustrated above, can have a user settable number of outputs, which can be changed with the Properties pop up dialog.
Outputs are light blue. Output values are displayed in decimal to 2 decimal places (settable in the Global Options dialog). The actual value is not rounded. You can get the hexadecimal integer value of the output by holding the mouse pointer over the output: the tool tip readout gives the label number (useful if there are a large number of outputs), followed by its hexadecimal value. If the module output is text, then text is displayed, and the tool tip shows the module output number followed by the full text of the output.
Module inputs
Modules can have any number of inputs from none to dozens. Inputs, if there are any, start at the line following the last Output, or at the 2nd line if there are no outputs. Many modules can have a user settable number of inputs, which can be changed with the Properties pop up dialog.
Inputs are white when they contain literal values, and light yellow when they contain connections. The connection label contains the connected module's Priority, output number and name. For example, the input connection to the Rand Int module illustrated above shows, "B1:Clock." This indicates the module is connected to the 1st output of a Clock module, that is located at Priority B (second in the run order for the Macro level).
Highlighting connections
At any time you can click on an input or output label to see at a glance the connections. If you click on an output label, the label highlights cyan and all inputs connected show a yellow highlighted input label; if you click on an input label, the label of the output that feeds it will highlight cyan, and only the input label you clicked on will highlight orange. If there are no connections to an input or output, the label you click on does not highlight.
Unlike soft synths which calculate at the audio rate, ArtWonk calculates at the relatively sedate MIDI tick rate of 24 ticks per quarter note. This means that it matters which module is calculated first, second, etc., much more than with soft synths because if you first calculate, for example, a sequencer value, then you calculate the clock that was to step the sequencer, the sequencer is stepped one MIDI tick out of sync. One MIDI tick is a 32nd note triplet. Fast but quite audible. So you need to pay attention to the order in which modules are calculated.
Each module at a given macro level will have a Priority assigned to it. This is the single character label at the top right of the module. In the Module Tree, modules will be listed in priority order from top to bottom, so the Tree listing always starts with A, then B, etc. When modules are run they are always calculated in this character order, starting with A, then B, then C, etc.
Changing module priority
To change a module's priority, first select the module from the Module Tree. You can do this by either clicking on the module icon in the Tree, or by double clicking on the module in the Workspace. Then right click on the module name in the tree that has the priority you want to assign to the current module. This will insert the selected module into the priority list at the point of the target module. If the target module was above the selected module, it will be inserted just ahead of the target; if the target was below the selected module, it will be inserted just behind the target. If the selected and target modules are adjacent, the positions will be swapped.
Module types
Modules fall into 7 main types: basic, macro & self, function, variable, sequencer & array, widget, and graphics. Here is an overview of the module types. For detailed information, see the documentation for the specific module or module type.
Basic modules
These are the standard modules that do most of the work. There are several sub types of basic modules, grouped in the module menu according to similar functionality. Some basic modules have user settable properties (blue priority label), but most do not (black priority label).
The scope of a basic module is its current macro level. This means basic modules know nothing about other modules outside their macro level, and cannot communicate directly with basic modules that exist in other macros.
Macro modules contain other modules, When you create a macro module, it appears as a normal module, but it has an extra button, an "@" button just to the left of the property button. Click on this button to open the macro. When you are in a macro, you will see a Self module that is the mirror image of the Macro. That is, the Self module Inputs are the same as the Macro Outputs, and the Self Outputs are the same as the Macro Inputs. This is how the Macro module communicates between the child modules inside it, and other sibling modules at its macro level in the module tree and workpage.
Since Macro modules contain within them other modules, the scope of macro modules is two levels, the level the macro module lives on, and the level within the macro.
Self modules are created when the Macro module is created, and have the
same name as the parent Macro module, but instead of a ball icon (![]() ), they have a dimple icon (
), they have a dimple icon (![]() ). They are set to priority "A" first in the
priority chain. While you are allowed to change the Self module priority,
unless you have specific reason to, you should leave them at priority A.
). They are set to priority "A" first in the
priority chain. While you are allowed to change the Self module priority,
unless you have specific reason to, you should leave them at priority A.
You can access Macro module properties, for example, to change the number of inputs or outputs, from either the Macro module or its Self module. To save a Macro module into the Macro library, click on the Save button in its properties. Save is only available when entering properties from the Macro, not from the Self.
To load a Macro module from the Macro library, right click on the module Workspace background, and select it from the popup menu. When you load the macro it will show up at the Workspace position where you right clicked.
Function modules enable you to write your own script that controls what the module does. When first created Function modules simply pass the input to the output of the module. To create a function, click on the property button, and write the function into the Function, Fn Reset or Fn Load text boxes. The difference between the text boxes is that Fn Reset executes only upon seeing a system wide Reset flag, and Fn Load executes only on the Load flag. This gives a quick and easy way to set up a function module with separate initialization functions.
Function modules may be saved and loaded from a library just as Macro modules. To save a Function module into the Function library, click on the Save button in its properties.
To load a Function module from the Function library, right click on the module Workspace background, and select it from the popup menu. When you load the function module it will show up at the Workspace position where you right clicked.
Like Basic modules, the scope of a Function module is its current macro level.
Global variables exist in two parts, the variable data base which is global and accessible at any macro level, and the local variable module that accesses the global variable, which only exists at the local macro level. Global variables may contain either values or text.
Global variable modules take on the name of the global variable they represent. You select the variable with the properties dialog, as well as whether the local module will be Read Only, Write Only, or Read/Write.
The scope of Global Variables is of course Global. Although the inputs and outputs of the specific local module that accesses the variable is local to the macro level.
When a macro is loaded that contains global variables, if a global variable with the same name already exists, the macro module will use that variable; if it does not exist then loading the macro will cause the global variable to be created.
Sequencer and Array modules.
Sequencer and array modules are very similar. Their function is to access and sequence through values stored in an array in memory. Array modules use global memory arrays, and therefore an array module can share its sequence data with any number of other array modules. Sequencer modules have their arrays stored with the module, so their sequence data is private to the module.
Widget Modules
Widgets are the knobs, sliders, and blinky lights that exist in the user interface Panel. When a widget module is created in the module Workspace, its interface component is also created in the Panel, in the upper left corner of the current Panel view. You can move the widget wherever you like by shift-click and drag.
There are four types of widgets: Input, Display, Grid, and Document.
Input widgets (red icon) include Knobs, Sliders, and Buttons. The Workspace modules for these have one output, which is the current widget value, and one input, for changing the output value and widget graphics (such as knob pointer) under program control. Input widgets can save and restore their value settings as Snapshots.
Display widgets (yellow icon) which include Meter, LED, and Readout modules, have one input, the value to show in the display readout, and no outputs.
Grid widgets (orange icon) are multiple widgets in a single widget module. They are set up in a grid of Rows x Columns, and the values are contained in a value array that is compatible with the Array modules.
Documentation widgets (green Icon) which include Label, Doc Box, Doc Pic and Frame modules have no inputs or outputs.
Most widgets have properties, which you can access either by right clicking on the widget in the Panel, or by clicking on the blue property button on its module in the Workspace.
Graphics Modules (ArtWonk only)
Graphics modules perform graphics drawing, image loading and saving, and pixel read & write. Artwonk includes both a quick and easy to use set of basic drawing modules, and an extended set of high quality graphics functions for image creation, processing and animation.
ArtWonk is Copyright © 2003-2014 by John Dunn and Algorithmic Arts. All Rights Reserved.